top of page
IMG_3486_edited.png
IMG_3565.JPG

Check Out Our Latest Designs

Subscribe and be the first to know about our latest card making designs!

I’m back with another Halloween project! This time I’ve decided to create a slimline card – my first ever slimline card. I found a delightful ghost background stamp from Technique Junkies called #S817 Boo Convention that I wanted to use on one of my cards this year. This is what I created. Enjoy!


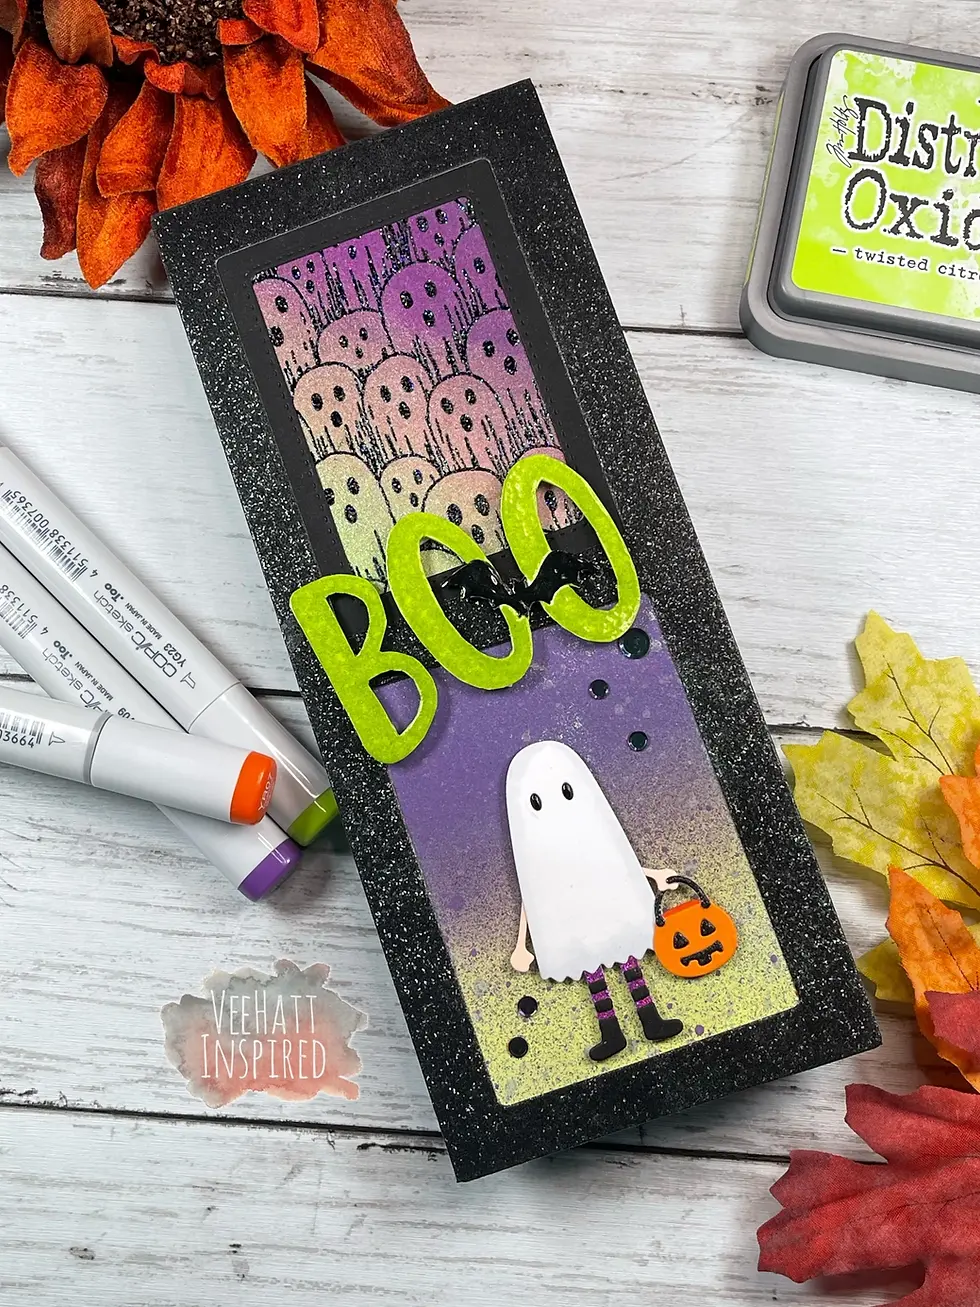
I used the Whimsy Stamps “Slimline ATC Windows” die set (the largest rectangular die and the next to the largest die in the set) and used them to cut my frame from black glitter cardstock. Then using the largest double-stitched ATC die from the set, I cut a small frame for the top window of the card using Cardstock Warehouse’s Sirio Ultra Black cardstock. Now to prepare my two backgrounds for the windows.


I grabbed a 4”x5” piece of Strathmore Hot Press Watercolor Paper and also Ranger’s Distress Mica Stains in Bubbling Cauldron and Fortune Teller and was off to the splat box. I very lightly misted the cardstock with water using my Distress Sprayer, then heavily sprayed the cardstock with both colors of the Mica Stain. I allowed the two colors to mix together slightly, but evenly, and then used the Ranger Heat Tool to completely dry the cardstock. I set this aside while I moved onto my other cardstock panel for the lower window of the card.


Using another piece of 4” x 5” watercolor paper, I blended Tim Holtz’s Ranger Distress Oxide, Villainous Potion and Twisted Citron, using a blending brush until I achieved the balance of the two colors I was happy with – then dried the inks with my heat tool. Once the ink was dry, I went back to the splat box and heavily splattered the cardstock panel with the Distress Mica Stains in the Bubbling Cauldron and Fortune Teller colors. This too was set aside to dry.


I used Altenew Clear Embossing Ink and the Technique Junkies “Boo Convention” background stamp and stamped the image onto the watercolor cardstock for the top window (the cardstock that was only sprayed with the two Mica Stains). I then coated the cardstock with a generous amount of Brutus Monroe “Raven Sparkle” Embossing Powder and gently tapped off the excess and melted the embossing powder with my heat embossing gun. Next, I trimmed this panel down to fit the frame for the top window of the card and glued it into place with Distress Collage Medium Matte adhesive.


For the bottom window of the card, I die cut all the necessary pieces for the ghost trick-or-treater from the Spellbinders “Eek-a-Boo” die set and glued the elements together, using the product packaging as a guide, to create the cutest little ghost figure. I used the C2 Copic alcohol marker to shade the white portions of the ghost and colored his little eyes with a black Glaze pen to make them shine.


Next, I took the Distress Oxide ink blended cardstock panel and trimmed it down so that is fit the lower window of the card front and glued it into place with the Distress Collage Medium Matte adhesive. I adhered the ghost trick-or-treater to the ink blended panel with Simon Says Stamp 3D Foam Squares and also glued some Studio Katia “Black Magic” Confetti around it for additional interest.


For the sentiment, I stamped the large Boo greeting from the Simon Says Stamp “Spook Up Some Fun” stamp set using Altenew Clear Embossing Ink, applied a layer of Wow! Lime Rickey embossing powder, tapped off the excess, and heat set the embossing powder with my heat gun. After it cooled, I began to fussy-cut around the greeting and used a PenBlade craft knife to cut out the insides of the “O”s. Once that was completed, I used Nuvo Crystal Drops in a Gloss-Ebony Black color to make the bat black and add some glossy dimension. I used Simon Says Stamp’s 3D Foam Squares to add the sentiment to the middle section of the card and that completes this project.


Thank you so much for stopping by to see me – I appreciate you doing so!


Until next time…


A while back I purchased a set of dies from Birch Press Design called Flora Plate Layer Set and I never did get a chance to use them. Today I sat in my studio and decided, “self, you are going to create a Halloween card with these dies before you do anything else”.


I began with a top folding, black card base using the beautiful black cardstock from Cardstock Warehouse called Sirio Ultra Black. For my layers, I chose Candied Yam (orange) cardstock from My Favorite Things, a piece of purple foil cardstock, and the top layer is the Distress Black Two-Tone Woodgrain from Ranger. I ran all three of these A2 size cardstock pieces through my die cutting machine and commenced gluing them together.


Next, I gathered up my Idea-ologyTim Holtz Halloween Paper Dolls and Halloween Transparencies to select a little boy and some bat wings to make the character for the card front. Using a YR07 Copic marker, I colored his sweater orange and used Ranger Glossy Accents to glue the bat wings to the back of the paper doll – of course I couldn’t leave well enough alone and decided to add the little mask to his face from the Tim Holtz Idea-ology Curiosities Sticker Book.


Using the Sizzix Tim Holtz Bold Text Halloween Dies, I chose to die cut the word “BOO!” for my greeting. I cut the greeting three times out of black cardstock and once from purple. Then I used Distress Mica Stain in the color Fortune Teller to fully cover the purple version of the “BOO!” and, once dry, I glued all the greeting letters together to form nice, sturdy lettering for the top of the card that adds wonderful dimension.


I used Distress Collage Medium Matte to glue the greeting to the card front and the Simon Says Stamp 3D Foam Squares to attach my little trick-or-treater boy… and that completes the card!


Thank you so much for stopping by to see me – I appreciate you doing so!


Until next time…


Sizzix / Tim Holtz released a very fun collection of stamps, dies, and Halloween accoutrement this year and my love of all things skulls inspired me to create this card. I used a couple of them in this design I hope you enjoy it!


This card panel all started with the Sizzix / Tim Holtz release of “Spencer”. I cut all the dies from white cardstock and used Distress Oxide Inks in various shades from Black Soot all the way up to Picket Fence to get the range of colors I wanted to create the skull. After the inks dried, I assembled the layers using Distress Collage Medium in the matte finish.


For the card’s background, I chose to go with a new member of my crafting stash – a 6×6 pattered paper pack from Whimsy Stamps called “Nevermore”. I selected the piece of patterned paper that I felt best suited Spencer and I absolutely love the piece I chose. There are so many good ones in this paper pack, but I could only choose one!


To create the frame, I used the Distress Black Two-Tone Woodgrain cardstock and a die set from Rubbernecker called “Nested Scallop with Holes”. I used the A2 sized frame from this set and used the Simon Says Stamp black foam squares to adhere the woodgrain frame and the skull to the background panel.


The only thing left was to add the greeting and embellishments. For the sentiment, I used the Simon Says Stamp “Spooky Salutations” sentiment strips. After selecting the sentiment that I wanted to use, I cut it out and used dark brown and black ink to edge the sides of the strip to give it somewhat of a weathered look. For my embellishments, I added a few gems from the Picket Fence Studios Gem Mixes called “Day & Night”. That’s it!


This was a very simple card that came together nicely thanks to the product creators.

Life is full of inspiration and experiences

Follow us on Instagram

  • Instagram
Subscribe to our Mailing List

Thanks for submitting!

  • Instagram

© 2022 by VeeHatt Inspired. Privacy Policy. All Rights Reserved.

bottom of page